.png?h=595&iar=0&w=2781&hash=5FD5E69473BCC22199FBFA2FB71B6033)

An Aquarist's Journal: Creating a Nano Reef, Part 1: Setup
Author: David Bell
Many have been skeptical of the mini-reef movement, but one non-believer decided to try his own experiment and attained marvelous results.
Creating a Nano World
When the buzz about nano reefs began several years ago, my immediate thought was, “Why would anyone want to have a small aquarium when they can have a large one? I want a tank as big as a small Pacific island, bigger if I can still find a place to put all my other stuff!” In retrospect, that conveys a hint of pretentious thinking and snobbery to me and, undoubtedly, to those who have already successfully achieved beautiful results in nano-reef creativity, husbandry, and management. I have seen some gorgeous nano-reef systems that seem perpetually healthy and thriving.
I assure you my reluctance had as much to do with the odds of attaining success while reducing high-risk factors than with size alone. A nano reef just seemed to demand too much restraint and self discipline to suit my taste. Could I possibly be satisfied with the results or even succeed?
There were two simple reasons that caused me to overcome my aversions and take a second look at this facet of aquarium keeping. The first may sound familiar—I had all this equipment sitting around, including a small tank, which could be put to better use. And the second, which I know sounds familiar—my habit is insatiable! There are so many fishes and corals I would love to have, but I do not have the places to put them all!
A well planned and properly maintained smaller tank can be just as spectacular as a large one, impressively reflecting the successful culmination of aquarium science and art in miniature form. With that success comes a desire to build upon the achievement, to become more advanced and determine just how successful the venture can be. Done right, the nano-reef aquarium becomes the role model of a project perfectly tuned.
The Challenge
The nano system inherently comes with limitations and requires exacting system maintenance, but if this is done properly, risk is minimized. However, to compromise or circumvent any aspect of nano-reef management is a formula for rapid breakdown and complete disaster. Total water volume is the primary concern; it influences so many other parameters in all aquaria, especially in any small system. Small water volumes are unstable and constraining as opposed to large ones and are particularly volatile in response to numerous external factors.
A beginner looking upon a dazzling nano-reef aquarium may be overcome by the beauty packed in such an unimposing volume and say, “I can do that!” They may buy into the belief that it is a good starting point. Many fish stores will display such systems accompanied with an all-inclusive price tag for the hardware, water, inhabitants, delivery, and setup. But experience in the saltwater hobby is needed to overcome the challenges presented by nano reefs.
I still do not manage an aquarium as large as a small Pacific isle, but with several years of experience and a reasonable degree of knowledge in successfully building and maintaining medium- to large-sized aquaria, I believe I have developed the abilities paramount to achieving success in the nano realm.
Basic Precepts
To begin with, I knew that my diligence (or lack thereof) with my 135-gallon tank must be more than doubled to achieve the same rate of success or better in my nano tank. This meant weekly or biweekly water tests would be sorely insufficient. Water testing at least once a day would be more like it, especially in the setup stage, before the system was stabilized. I have even conducted a full range of water tests twice in a day’s time because parameters can and do change that quickly. Second, I was determined to do things by the book. For the most part, the basic tenets of this approach have remained intact throughout setup.
Assume there is no margin for error in building a nano-reef system. If this is your first attempt at building such a small system, put experiments and unproven methods aside, at least until enough experience is acquired to gain the ability to decide that risks will not prove irreversible or disastrous.
I had a plan that included everything from identifying hardware components to developing a timeline from setup to stocking the aquarium with fishes and invertebrates. I often identify necessary tweaks and changes once I see the entire scope of things laid out before me. But any plan starts with wants, and I certainly have those.
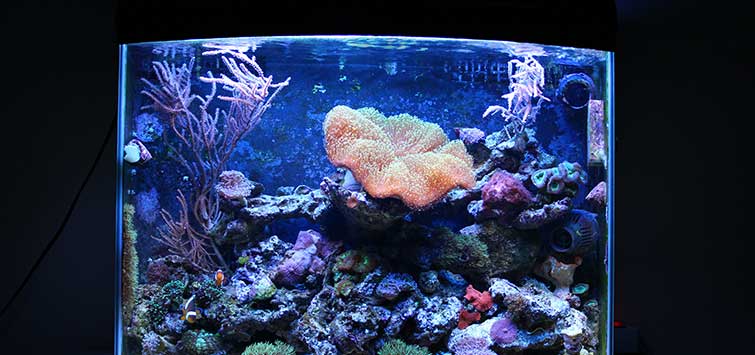
The Setup
The tank I already had available is a simple one—a 30-gallon measuring 36 x 12 x 16 inches. I did not go with a prepackaged kit because I like the flexibility of determining my own components and selectively beefing up those I believe are most important. The 30-gallon tank is generally the upper maximum of volume to be considered a nano-reef system. For my purposes, it is large enough to house the fishes and invertebrates intended but not so small as to further increase risk exponentially, which is involved with even smaller water volumes.
Six Vital Components of a Reef Tank
· RO/DI water
· Aragonite-based reef sand/substrate material
· High-grade live rock (cured, mature, and full of life)
· An efficient protein skimmer
· Devices that produce excellent overall water motion
· Effective quality lighting
Water Quality
I use only RO/DI water for mixing synthetic seawater and top-offs and use a high-quality sea salt mix to produce seawater for all of my tanks. I would not consider using water that has not been purified to this degree, since even minor traces of impurities may have significant impact in small water volumes. I keep at least 10 gallons of mixed seawater stored and circulating at all times, which is specifically dedicated to this 30-gallon system, and I change at least 5 gallons every week.
I perform all water adjustments, such as applying buffers and other additives, to the pre-mixed salt water only and then check the water parameters again in case I have made an error. I never apply additives directly in the tank, as the impact is too abrupt to fishes and especially invertebrates and any mistake in dosing can prove lethal. In fact, other than adjusting for proper calcium levels, alkalinity, and pH, I tend to avoid additives and allow a premium salt mix to provide balance.
Substrate
I used dry aragonitic reef sand to achieve a substrate depth of over 3 inches. It was combined with a few cups of live sand from another reef tank. The mineral/element content from a high grade of true reef sand will aid in stabilizing calcium and alkalinity levels while helping prevent large drops in pH, all parameters that must be monitored closely in all reef applications where sudden or large fluctuations in water chemistry can prove fatal to delicate invertebrates. The grain size ranges from 0.25 to 0.75 mm. A finer, rather than coarser, material promotes microbial activity in the sand bed while reducing the potential for anaerobic areas and provides cover for a variety of reef animals that live, browse, burrow, or hide in its depths.
I also incorporated a small amount of coarser substrate material that comprises the upper layer of substrate across the front of the tank, extending about halfway to the back (finer sand particles will work their way down and leave coarser material on top). This provides a firmer base for certain corals, such as plate and brain corals, which do not appreciate frequent sedimentation on their surfaces, as they may be unable to easily shed such matter. The coarser material inhibits the dispersal of fine sand into the water column, which produces cloudy water conditions and raining particulates that could adversely affect such corals and other organisms.
Live Rock
The live rock for this system came from three sources: the local fish store, an existing reef system, and a FOWLR (fish-only-with-live-rock) system. The new rock has introduced a greater variety of living organisms while all of the rock had extensive coralline algae coverage and significant color and species diversity.
Skimming, Water Movement, and Filtration
Skimming
I believe in at least doubling the recommended skimming ratios in my systems. In this case, I went even further and purchased a top-grade protein skimmer rated for up to 100 gallons. It does an excellent job and seems to be more efficient on this tank than skimmers on my larger systems, which is a matter of great importance as far as I’m concerned. I want to remove as much organic matter and nutrients as quickly as possible, since waste can rapidly promote deleterious conditions in a very small system.
Detritus
Only a few months after start up, there is very little detritus visible in my nano tank, and what is there doesn’t remain long. I aim to keep it that way, primarily through frequent water changes and the use of devices that ensure superb water motion throughout all parts of the system. Secondarily, I rely upon scavenging animals—fishes and invertebrates—to keep the accumulation to a bare minimum.
Water Movement
I use a diffusing powerhead rated at 620 gallons per hour (gph) for primary water movement. The skimmer provides another 295 gph. I also installed a hang-on filter rated at 280 gph. Since I have not yet completed installation of a sump or refugium on this system, the mechanical filter currently provides additional water flow and a location for a 100-micron filter pad to remove particulate matter, as well as high-grade carbon and an absorbent polymer to further remove organics and polish the water. I service this unit (along with the skimmer) and change filter media once a week to reduce nitrate introduction, which can easily result from allowing these filters to turn into dirt traps. On paper, the total system circulation is around 1,820 gph, or 61 times the total water volume per hour, but other factors reduce that number.
Lighting
As for lighting, I utilized a spare 36-inch, fan-equipped, dual power-compact fixture totaling 192 watts of output. I prefer a bulb combination of 420- to 460-watt actinic and a 96-watt, 10,000K daylight that provides a very pleasing and natural look. The corals fluoresce quite well under this combination of mixed actinics when the daylight bulb is off. I run the actinics for 12 hours and run the daylight for six to eight hours. Two small LED lunar light units (with five lights each) illuminate the tank for two additional hours after the actinics go off and prior to the actinics coming back on.
The main lighting system produces a strong 6.4 watts per gallon, meaning the light that reaches the substrate is bright. I have successfully maintained various hard corals, such as Duncanopsammia axifuga, Caulastrea furcata, C. curvata, Fungia spp., Favites spp., Blastomussa spp., Trachyphyllia spp., and Cynarina spp., under this same lighting fixture in a tank as deep as 18 inches. This nano system also has not been prone to abnormal temperature fluctuations under this lighting regimen; my temperature has consistently remained between 78° and 80°F, exactly where I want it. Aside from this basic hardware, the only other equipment I currently use is a 100-watt heater set at 72°.
Future Plans
My plans call for the addition of a sump/refugium underneath the main system. Aside from an increase in water volume by approximately 30 to 50 percent and an improvement in total circulation, this addition will incorporate a deep sand bed and live rock/coral rubble to enhance the biological filtration, serve as a source of food, provide an area for filtration media, and accommodate the heater and skimmer.
Another item on the to-do list is the eventual replacement of the power-compact lighting fixture with a T5 high-output unit with at least a four-bulb configuration. I like flexibility, and there are a wide variety of bulb colors and temperatures available in the T5 format, which I believe would be a positive enhancement both aesthetically and physiologically to reef inhabitants. T5 bulb life is also significantly longer than that of power compacts.
The Process
Specifications
At initial setup, pre-mixed RO/DI seawater was adjusted to the following specifications before being added to the tank with substrate material already in place: temperature 78°F, specific gravity 1.026, salinity 35 ppt, pH 8.2, alkalinity 8 dKH, and calcium 450 ppm. These parameters were monitored daily and recorded during the first three weeks, then three times per week thereafteras well as before each introduction of live rock, fishes, or invertebrates.
Filter
The mechanical filter was run during the first week with double 100-micron filter pads of inert material and double carbon-filter inserts (all changed once during the first week) to clear particulate matter and any existing impurities. At the end of one week, the pads and inserts were changed again in preparation for introduction of the live rock, and water parameters were again tested and adjusted as necessary before the live rock was added.
Rocks
Live rock was introduced from all three sources concurrently. The final design reflected a low-profile, open structure with various territories, which a 3-foot tank allowed.
Water Parameters
With the introduction of live rock, water parameters were checked daily and adjusted as necessary with additives being mixed and introduced with RO/DI top-off water or with water changes. I began moderate water changes even at this early stage, assuming that there could be some die-off from the rock. However, there were no spikes or detectable ammonia or nitrite levels subsequent to adding live rock.
The system was run for four weeks after it was cycled with no life being introduced. The only devices that were utilized during this period were one 620-gph powerhead, the mechanical filter with carbon and inert filter pads, lighting (cycled on/off for full schedule by timers), and a heater.
Filtration
A skimmer was not installed until the end of the tenth week. At this stage, I believe that the biological filter should be allowed to develop unimpeded and without the intentional or unintentional excessive removal of any beneficial organisms or nutrients from the system via the skimmer. Organisms introduced with the live rock proliferated greatly during this period.
With a fully functioning, healthy biological filter, the tank was actually cycled by the end of the second day from the point of introduction of the live rock. Ammonia and nitrites have been measured at 0 since that time, and neither of these compounds ever reached more than barely detectable levels during the first two days. Nitrate levels were undetectable for the first four weeks and remained under 5 ppm during the next three weeks. By the tenth week, nitrate reached its highest reading of 20 ppm. At this point, I installed the new skimmer to the system, which immediately began producing skimmate. Within two days, nitrate levels dropped to about 7 ppm, and they still remain between 5 and 10 ppm.
Introducing Specimens
Four weeks after cycling, I began introducing one or two fishes at a time in addition to a few small zoanthid colonies, corallimorphs, and octocorals. Some were purchased while others were transferred from other reef systems. The fishes are thriving, and the corals are responding naturally and showing growth. I have since added several hard corals that are thriving as well.
Upkeep
I continue to monitor and record system water parameters and perform all routine maintenance activities on a strict schedule.
The Early Results
I have to confess, this nano-reef system thus far is the healthiest and least problematic of any system that I have set up or currently maintain. I have three other tanks in my home, yet this one seems to provide the greatest pleasure, although it does require the most attention to ongoing maintenance.
Tank Status
Although this tank is already heavily stocked, nitrates have remained low and accumulations of detritus are almost nonexistent. Good water motion, heavy skimming, low organics, a healthy biological filter, and clean-up organisms have kept nuisance algae virtually undetectable at this early stage. I also believe that the rapid stocking of filter-feeding invertebrates has helped to consume nutrients that could otherwise cause problems. Coralline algae growth is exceptional, and corals are expanding and feeding well and showing new growth even as the system is in development.
Fish Status
All fishes are extremely healthy and eating a wide range of foods offered in combination with vitamins, fatty and amino acids, and garlic additives. Corals are being fed a wide variety as well and receive zooplankton, phytoplankton, an oyster egg formula, and various frozen seafood preparations incidentally with the fish feedings. Corals that need it are directly fed two or three times weekly. The heaviest stony-coral feedings are given in the early morning under lunar lighting, when tentacles seem fully extended.
Challenges
Problems or unexpected challenges have been extremely negligible. Alkalinity and pH are the variables that have been the most unstable. I use a two-part alkalinity/calcium additive to maintain both readings at optimal levels, and I have found that this adjustment must be performed two to three times weekly, but alkalinity and pH typically drop faster than calcium levels.
That’s about it! With attention to details and regular maintenance, this system runs like clockwork. I mostly just enjoy it. Before attempting a nano-reef aquarium, I didn’t think I would say those words. Next month, I’ll talk about my livestock choices and how the reef is progressing.
See the full article on TFH Digital http://www.tfhdigital.com/tfh/201206#pg93