.png?h=595&iar=0&w=2781&hash=5FD5E69473BCC22199FBFA2FB71B6033)
The Reefer: Fragging Small-Polyped Stony Corals
Author: James W. Fatherree M.Sc.
Stony corals may have rigid skeletons, but they are by no means unbreakable. Those that build branching and plating colonies of hundreds and thousands of polyps are particularly susceptible to being cracked apart when large storm waves break them up. However, each piece of a colony can survive and form a new colony, and we can use broken-away fragments of colonies in our tanks to form new coral colonies, too.
By intentionally breaking off pieces and manually affixing them to hard substrates, which is called “fragging,” a hobbyist can eventually fill a whole tank with coral. So, this month we’ll look at how to frag corals, and some of the added benefits of doing so.
Intro to Coral Fragging
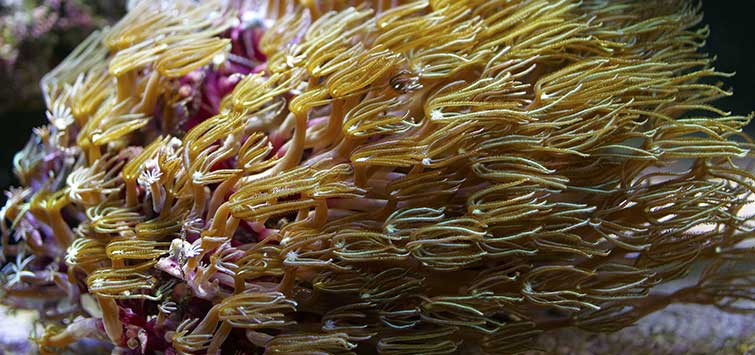
To start, any type of small-polyped stony coral (SPS) can be fragged, regardless of its overall form. Everything from thinly branched specimens of Seriatopora, to thickly branched Acropora, plating Montipora, and massive Porites colonies can be broken or cut to pieces, and each piece can be used.
The size of the frags doesn’t matter much either, as pieces as small as a half of an inch can grow into full-size colonies when well cared for. So, if you intend to fill your tank with frags, you don’t have to be picky about what you start with when choosing corals for your aquarium. And with that said, let’s get right to what you need and how to do it.
Materials Needed
You’ll need a few materials, but not much. A complete fragging “kit” consists of these materials:
- Gel-type cyanoacrylate (super) glue
- Aquarium-safe epoxy
- Paper towels
- A pair of needle-nose pliers
- A hacksaw blade
The glue and epoxy are obviously used to affix frags to something, the pliers can be used to break away branches, and the saw blade can be used to carefully cut away any particularly thick branches, or to cut chunks off any non-branching colonies should you choose to.
The Process of Fragging
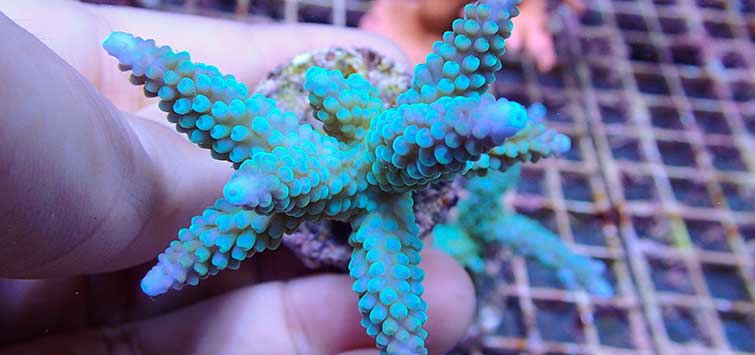
Let’s begin with how to frag a typical branched colony of Acropora, or something similar.
Step 1
Using the pliers, grab hold of a branch, or even a whole section of branches, and give it a little twist. Usually it’ll break away easily enough and can then be placed into a bowl of tank water. Continue to break away as many frags as you like, and put them all in the bowl of water. Do note that you shouldn’t put frags from different species together in the bowl, as they can still sting each other while sitting around waiting on you. In fact, if you plan on fragging more than one species at a time, I’d go ahead and replace the water in the bowl after you finish with each particular species as an extra precaution.
Step 2
Once you have your frags in the bowl, you’ll need to either glue them to pieces of rock, dead coral skeleton, shell material, etc., or use the epoxy to do so. The glue can be used if you intend to attach them to something outside of the tank, while the epoxy should be used if you intend to do the attaching in the tank/underwater or if you’re dealing with something particularly large.
If you have some small pieces of rock, etc., all you need to do is dab the end of the frag on a piece of paper towel to dry it a bit and remove some of the mucus that they’ll produce when injured, then glue it in place. If the rock is wet, I’d also dab dry the area where you plan on putting the frag. The glue can actually be used underwater and will set when wet, but it works much better on dry surfaces. Just apply a generous amount to the exposed end of the frag and then stick it in place on the rock. Hold it very still for a minute to let the glue grab hold, and then give it a little wiggle to see if it’s firmly attached.
Step 3
Once it feels like the glue has started to set well, you can place the whole thing into the tank and the glue will continue to “dry,” and you’re done.
It’s that easy. Really the hardest part is managing not to glue your fingers together, which at times, for some reason, is more difficult than you’d think. Also note that you can glue several small frags onto one rock, and if they’re all the same species you’ll likely get a really neat-looking colony when they all grow together.
Other Things to Consider
Frag Size
I mentioned frag size above, but just to clarify something, I personally wouldn’t make any frags less than a half inch or so. Frags of any size can grow into whole colonies, so you could indeed make some that are much smaller than a half inch. However, such tiny frags are really a pain to handle, and you’ll likely end up with glue all over your fingers and the frag, too. Then you get a frag glued to you and not the rock. Still, if you’re careful, maybe you could use the pliers to hold a miniscule frag (without crunching it) and keep your fingers glue-free.
Excess Gluing
Don’t worry about getting a little extra glue on the frag, either, or any extra that may squirt out from under the end of the frag once it is put in place. It’s not bad for the coral, and over time the base of the frag will begin to grow, eventually covering up all evidence of the gluing with new skeletal material.
Epoxy
As mentioned above, if you want to attach some frags to things that have to stay in the tank, like larger pieces of rock that can’t be pulled out, you should use the epoxy. Again, it’s also best to use epoxy for any particularly large frags. There are a few types of aquarium-safe epoxy available that are safe for use and come in sticks that look like some sort of putty.
Basically they come in two parts that begin to set and harden when they’re mixed together, but only require some kneading to mix them. The sticks of epoxy have one ingredient on the outside, with the second ingredient on the inside of the stick. So, all you have to do is cut off an appropriate-sized slice and knead the two together with your fingers. Be aware that once you knead it up, you have only a few minutes to use it, as it will start to harden.
I’ve found that the best way to use it is to knead a little ball of the epoxy, then press it firmly onto the spot where you want to place a frag. Then push the end of the frag down into the epoxy and gently pinch the epoxy into place around the base of the frag. Note that the epoxy isn’t sticky like glue, though, which means it won’t stick well to smooth(er) surfaces like glass, shells, or smooth rocks; in those cases it’s best to use it on rough pieces of substrate. Again, use plenty, and don’t worry about having the frag stuck down into it, as it will overgrow the epoxy over time and completely cover it. Of course, the epoxy can also be used to hold small mounted frags made outside the tank in place once they’re put into it.
Plating Corals
When it comes to plating corals like Montipora or Turbinaria, rather than using the pliers, you can usually just snap a frag off with your fingers. The rest is no different once you’ve got the pieces, as they can be glued or epoxied just like branching corals. But non-branching/plating corals that take on a massive form can require a bit more effort.
For corals like a large Porites, I’ve used a hacksaw blade to carefully saw off a chunk of a colony. That might sound weird, but it works. The skeletal material is soft and porous enough that a fine-toothed saw blade usually cuts right through without too much work. Of course, this is much easier to do if you can remove the specimen from the tank and do the sawing on a table. If not, be careful that you don’t start banging around in the tank and end up breaking something that you don’t want broken.
Careful Placement
I do have to mention that you should carefully choose where you intend to place any frags before you get started. Take a good look at your tank and where the frags can be placed so that they can grow over time without causing trouble for each other or any other nearby corals. Many SPS corals can injure or even kill others if they grow too close to one another or actually touch each other, so don’t let it happen.
Of course, part of the maintenance of a well-stocked tank is going through and pruning branches of various specimens to make sure they don’t get too close to each other, but the point is that you should do some thinking and planning ahead of time to keep things as easy as possible down the road.
As you make your plan, remember to take lighting and current into consideration, as well. Don’t make the mistake of breaking frags off a coral that has been low in a tank and then placing the new piece right under a bright bulb at the top of the tank. Frags can suffer from over-lighting just like any colony can. If you want to avoid such a thing, you’ll need to put the frags onto appropriately sized pieces of rock that can initially be placed at about the same level as the colony. Then, they can be slowly moved upward toward the lights over a period of several days to a couple of weeks, depending on the situation. Likewise, you don’t want to take frags from a coral that needs strong current and stick them somewhere that has low flow, or vice versa. I’m sure you get the idea.
Advantages of Fragging
Now with all that said, I’ll point out some of the advantages that come with fragging corals, other than simply filling up your tank with colonies.
Frag Swaps
First of all, there are marine aquarium clubs all over the world, and most hold occasional “frag swaps.” In general, these occur at club meetings, and all members that have some frags bring them to the meeting and work out trades with other hobbyists. This means you can get a hold of all sorts of corals free of charge, and you can typically find things that you might not come by otherwise. Some clubs also have frag auctions to raise money. Members bring in frags and instead of working out trades, the attendees bid on frags with some portion of the money going to the hobbyist and some to the club’s treasury. If there’s a club in your area and you’re not already a member, be sure to check it out.
Trading for Store Credit
Many retail shops will also trade frags or take them and give you a store credit for some agreed upon amount. So, you can get some different corals in a trade, or build up some store credit to help pay for new equipment and/or supplies, like salt and such. In fact, it’s quite possible to produce enough mounted frags to end up paying for all your aquarium-related expenses, as long as there’s a shop willing to take them off your hands.
Trading and Selling
I’ll warn you, though, it’s easy to get carried away when it comes to fragging. If you eventually start to produce a lot of mounted frags, the time will come when you’ll want to set up a whole tank just to keep them in until they reach a good size for trading/selling. I’ve even seen one hobbyist’s garage that was completely filled with tanks full of frags. No need to go that far though, as I’ve seen frags being reared in a lighted sump tank under a main tank, too—no new tank needed.
Saving the Environment
So you can trade them off, auction them, sell them, maybe get store credit for them, etc., which can help to fill your own tank and/or reduce the cost of maintaining it. But it goes a bit further than that even still. Every time you get a new coral that was made by fragging another one, whether it’s by a hobbyist or an aquaculture business, etc., it’s one less coral that’s collected from the wild. Thus, I highly recommend that you try fragging your own corals, or at least buy aquacultured corals raised from frags.
For More Info
To finish up, if you want to find out more about fragging various corals, including softies, there’s a ton of information at the Geothermal Aquaculture Research Foundation’s website (www.garf.org). There’s also the Book of Coral Propagation by Anthony Calfo (Reading Trees, 2001), which is a good one for your collection, too. Between these two sources, I think pretty much anything you might want to know about the topic of coral fragging is covered.
Enjoy your frags!
See the full article on TFH Digital http://www.tfhdigital.com/tfh/200711/#pg70